Techy has acquired NerdsToGo
Best Tips and Tricks to Solve Common iPhone Problems

- Posted on
- Thu, May 16, 2019
The smartphone is one of the most well sought after and groundbreaking technological advancements ever created. It has shaken the very core of how we communicate, gather information, and live our daily lives.
Despite having the luxury of having such a complex and advanced piece of technology that seems to have no boundaries as far as what it can do, nothing is still ever perfect. We come across common iPhone problems where troubleshooting is a necessity.
Because of this, there are public forums, video tutorials, and detailed instructions online to help us figure out these common iPhone problems quickly and effectively. With that being said, we at iDig Digital have mapped out a list of common iPhone problems that you may be experiencing so that you don’t have to go searching the net for the solution.
Common iPhone Problems & How To Troubleshoot your iPhone XR or XS
Luckily for iPhone users everywhere, there’s an abundance of troubleshooting websites and online forums to refer to whenever faced with an issue with your iPhone. With this simple, easy-to-use guide on how to troubleshoot common iPhone problems, you can rely on one source for information to keep your iPhone working in perfect condition.
Here is a list of 10 common iPhone problems and how to fix them.
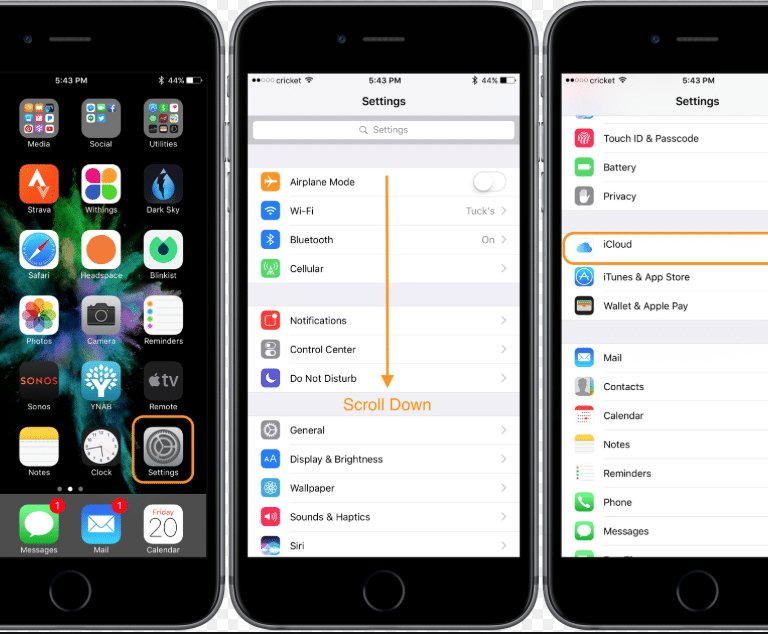
1. How to Back Up My iPhone with iCloud
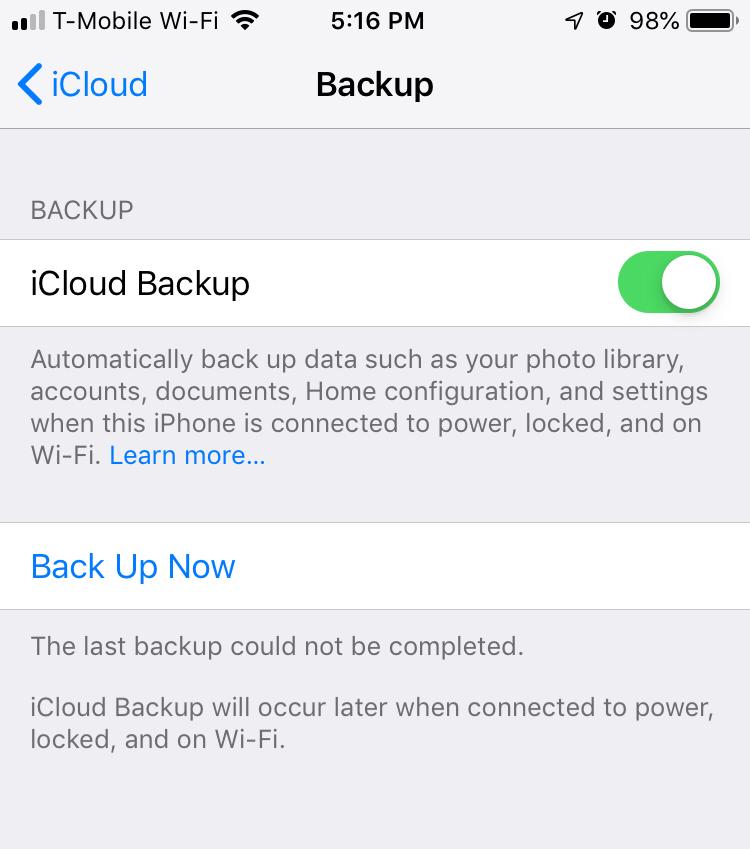
- Connect to your WiFi network on your device
- Go to “Settings” > [Your Name] and tap “iCloud”
- Go to “iCloud Back Up” and tap to make sure that it’s green (activated)
- Tap “Back Up Now” and make sure that you’re still connected to your WiFi network until the process is complete
- You can check the progress of your back up by refollowing the instructions above, as this process may take a few minutes
- Automatically back up with iCloud by keeping your iCloud Back-Up Mode activated (green) and ensure that you have enough available space on your iCloud for the back up (you can purchase more storage space on the Apple website if necessar
2. How to Manage Storage on iPhone
IOS 3 or Later:
- Go to “Settings” > [Your Name] and tap “iCloud”
- If you’re using iOS 11, tap “Manage Storage” > Backups
- If you’re using iOS 3, tap “iCloud Storage” > Manage Storage
- Tap the name of the device that you’re using
- Tap “Delete Back-Up” > Turn Off & Delete
IOS 2 or Earlier:
- Go to “Settings” > General > Storage & iCloud Usage
- Under “iCloud,” tap “Manage Storage”
- Tap the name of the device that you’re using
- Tap “Delete Back Up” > Turn Off & Delete
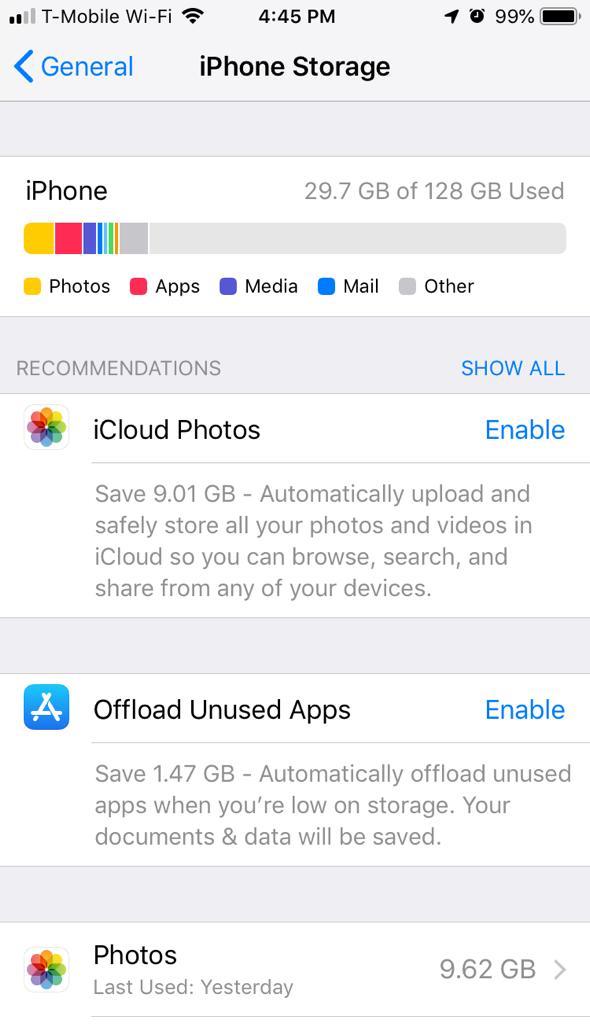
You may also manually delete photos, emails, and other apps that may be using up a lot of storage on your device. You can check how much storage is on your device and what specific apps may be the root cause of what is taking up too much storage space. To do this, you would simply have to…
- Go to “Settings” > General
- Tap on “iPhone Storage”
On the top of your screen, you will see how much gigabyte (GB) or megabyte (MB) storage is being used on your phone and how much storage each app is using. From there, you can coordinate which apps are necessary and which are not so that you can make deletions to your device.
3. How to Delete Apps on iPhone 7
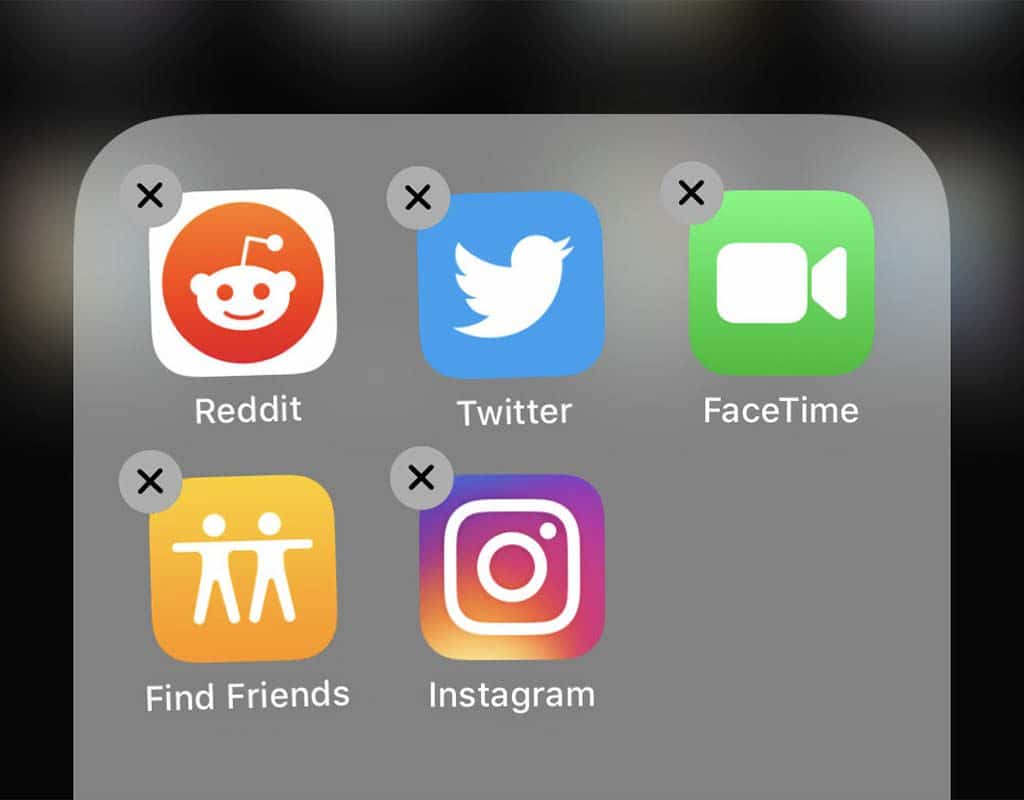
- Locate the app icon that you wish to delete on your iPhone
- Tap and hold your finger on the app icon until you see “X” marks located in the top lefthand corner of every app on your screen (you’ll also notice that the apps are shaking)
- Tap the “X” mark on the app that you wish to delete on your iPhone
- Once you tap on the “X” mark, you will see a message box stating that “deleting this app will also delete this data”
- Tap “Delete” to confirm that you wish to delete the app
- From there, you can press your home button so that the “X” marks on your apps disappear and your phone is available for proper use once again
4. How to Unlock iPhone Without Password
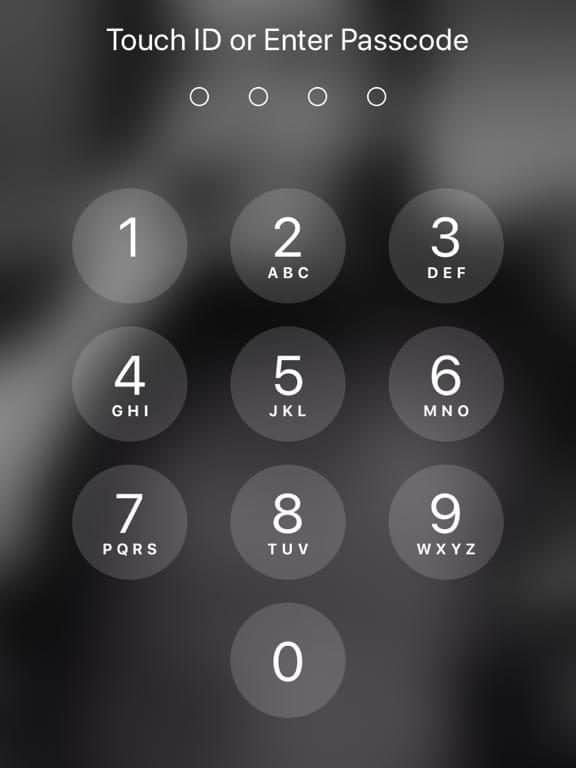
In a world where everything is secured by a password or code, it’s no wonder why we can sometimes get unorganized and forget our password. Luckily, there are ways to unlock your iPhone without a password.
Here’s how to unlock your iPhone without a password if you’ve never synced your iPhone to iTunes before.
- Open iTunes on your computer and sync your iPhone device to your computer using your iPhone charger cable (USB cable)
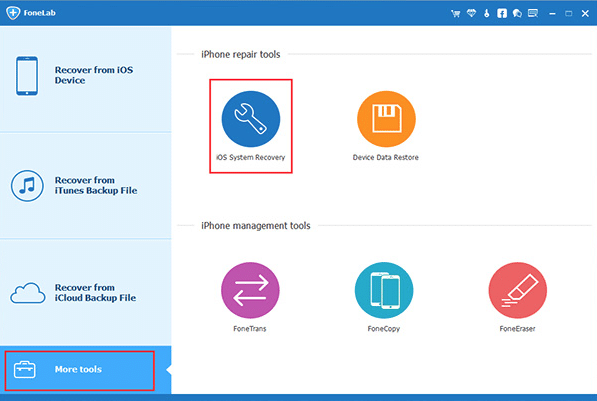
- You may receive an error message stating that iTunes could not connect your iPhone because it’s locked with a passcode. This means that your iPhone may not be recognized, and therefore, you must enter your iPhone into “Recovery Mode.” This can be done by using the IOS Repair System, which is a free recovery mode too

Once your phone is recognized after clicking “Enter Recovery Mode” on the IOS Repair System, an iTunes message will pop up saying “Connect to iTunes”
iTunes should then alert you that it has detected your iPhone in recovery mode. Click “OK” and then click “Restore”
After restoring your iPhone as a new iPhone, you can set up a new lock screen passcode
If your iPhone was synced with iTunes previously, then there are fewer steps involved.
- Connect your iPhone to your computer
- Run iTunes on your computer
- Right-click your iPhone on the lefthand side of iTunes and click “Back Up”
- When the back up is complete, click “Restore”
- After the process of restoring is complete, recover your data from your most recent back up in iTunes
If you want to unlock your iPhone without using iTunes, here’s how.

- Connect your iPhone to your computer
- Open the IOS Repair System
- The IOS Repair System will detect that your device is not in working status
- Click “Advanced Mode” > Continue
- Make sure that you’ve backed up your data on your computer since this advanced system will wipe out all of the data on your iPhone
- Download matching firmware package on your IOS device
- Once the download is complete, you may start repairing your iPhone by clicking “Repair Now”
5. How to Reset iPhone
There are several ways to reset your iPhone. The most common way is to perform a hard restart, which goes as follows:
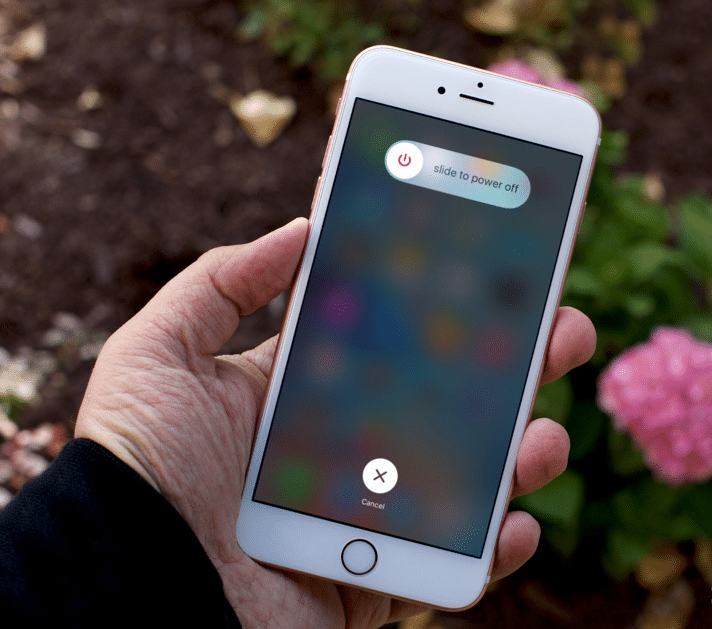
- First, check to see if your iPhone could shut down normally by holding down the power button until the “Slide to Power Off” option appears
- When this happens, slide the arrow from left to right
- If you have an iPhone X, press the volume up button, then the volume down button, and then hold the power button to restart your iPhone
If your iPhone won’t shut down, then this is what you can do first.
- Hold down the home button while simultaneously holding down the power button to perform a hard restart (hold down for approximately 10 seconds or so)
- iPhone 6S and earlier: Power button and home button
- iPhone 7 and 7 Plus: Power button and volume down button
- iPhone 8, 8 Plus, and X: Volume up, then volume down, then power button
If this option does not work, then you can try this.
- Go to “Settings”
- Tap your Apple ID and make sure that you’re signed in to your iCloud account
- Tap “iCloud” > iCloud Back Up
- Slide the icon next to “iCloud Back Up” to make sure that it’s activated (green)
- Tap “Back Up Now” and make sure that you’re connected to your WiFi network
- After you’ve successfully backed up your data on your iCloud, revert back to “Settings” > General
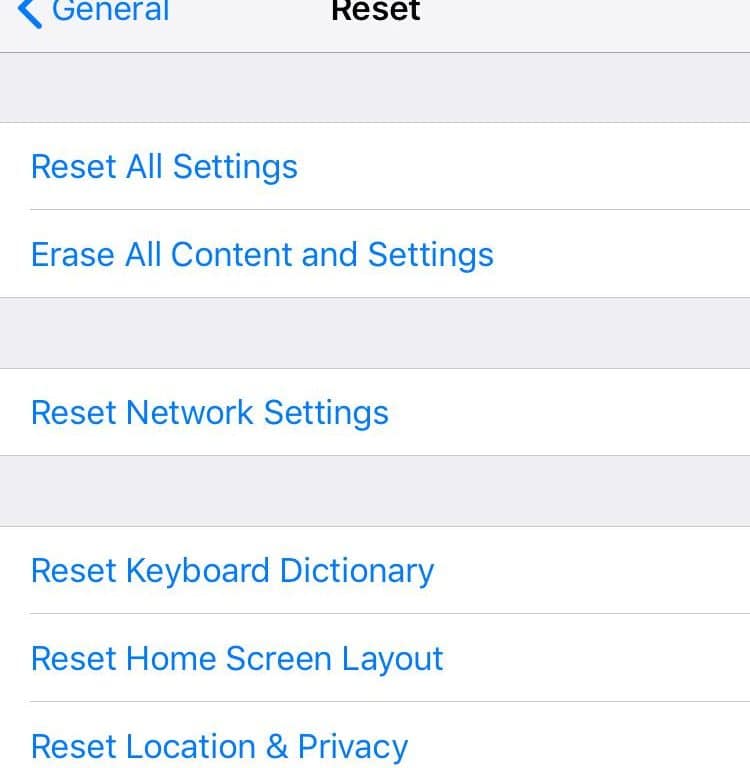
- Scroll down to tap “Reset”
- Tap “Erase All Content and Settings”
- Then, enter your passcode
- A pop-up message will appear stating “This will delete all media and data, and erase all settings”
- Tap “Erase iPhone”
- After you’ve completed this step, simply restore everything that you backed up on your iCloud from your computer, as it will give you prompt instructions on how to do so
6. How to Screen Record on iPhone
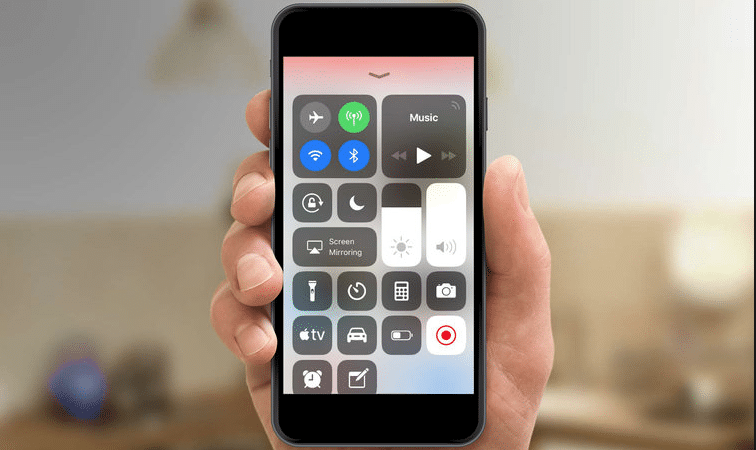
- Go to “Settings” > Control Center > Customize Controls
- Tap the green circle with a “+” sign in the middle next to “Screen Recording”
- Swipe up from the very bottom edge of the screen and press deeply on the gray circle icon located at the very bottom
- This will start a 3-second countdown and your screen will automatically record
- When finished recording, you may tap on the now red circle or you can tap on the red status bar appearing at the very top of your screen and choose the option to stop your recording
- Your screen recording will be available to view in your Photos
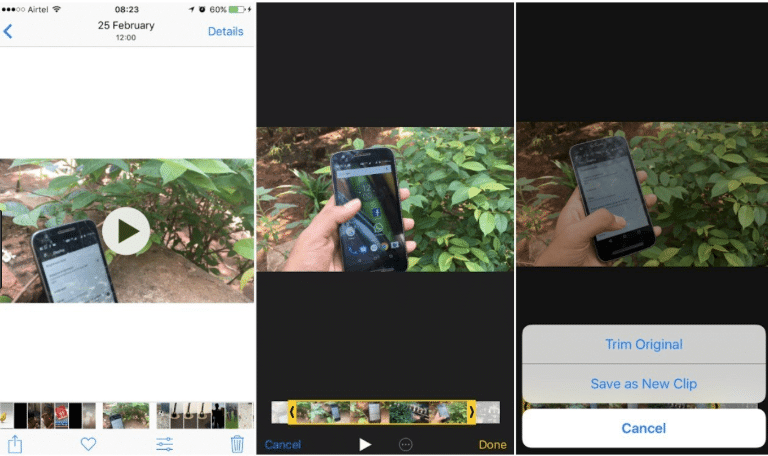
7. How to Edit Videos on iPhone
- Go to your “Camera” icon
- Slide to the “Video” option
- Record your video by pressing the white recording button at the bottom
- If you have already recorded a video that you wish to edit, relaunch it in your Photos
- Go to “Photos”
- Select the video that you wish to edit
- Tap the “Edit” option
- Use the video editor tool located at the bottom to capture which clips of the video that you wish to keep or delete. Whatever is within the yellow bar will be saved as a new clip while the footage outside the yellow confined areas will be deleted
- Once you’ve clipped your new video, tap “Done” on the bottom right-hand side of your screen
- Tap “Save As New Clip”
- Your new edited video will appear next to your unedited one in your Photos
8. How to Record a Phone Call on iPhone
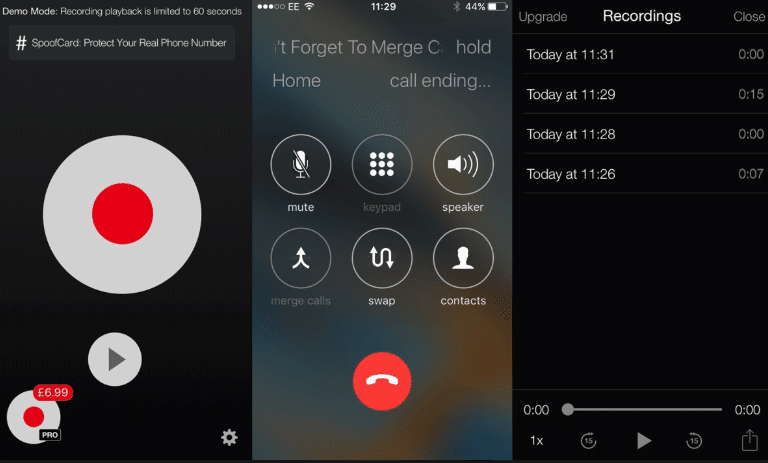
To record a phone call, you’ll have to download an app. This option isn’t available on the premodified settings on your phone. But no worries! Your iPhone is smart enough to pick up the app’s features and work alongside the regular phone system to record your phone call. Here’s how
- Go to your App Store on your home screen
- Go to the “Search” option on the bottom right-hand side of the screen
- Type “Call Recording”
- From here, you have several options. TapeACall Pro costs $0.99 for the app and doesn’t charge you per minute of recording. Call Recording by NoNotes is free when you download and you get 20 minutes of free phone recording time per month. Once you exceed 20 minutes per month, then the service expires and costs $0.25 per minute. Lastly, Call Recorder – IntCall is a free download upfront, but it costs $0.10 per minute of phone recording time
- Choose one of these apps by tapping “Get” next to the app, or if the app is not free for download, the price of the app will be on your screen instead
- Tap “Install”
- You may be given the task of plugging in your Apple ID account info and password to sign in to your account (if you’re not already signed in)
- Once this is done and your app is installed, launch your app by simply tapping on the icon
- Launch your app and make a call. Although the specifics may vary from app to app, they all essentially work the same. You will be connected to their servers and the call will be merged with the line that you’re calling
- You may be prompted to add your phone number and accept the app’s Terms and Conditions
- Once the call is merged, the recording will begin and automatically stop recording once the phone call has ended
- To playback your phone call, you may either look in the app’s storage listing or your iCloud For instance, on the Call Recorder – IntCall app, you will tap “Recording” at the bottom of the screen to bring up the list of your call recordings. Then you simply press “Play” to playback the recording
9. How to Download YouTube Videos on iPhone
Downloading YouTube videos on your iPhone is as easy as retrieving a YouTube Downloader Tool from the Documents App. Although there are various ways to do this, this way is the most practical. The Document App’s icon is a black “D” with the top left-hand corner of the “D” having a yellow and green paper folded design in front of a white background.
Once you’ve downloaded the app from the app store, follow this series of steps:
YouTube

- Go to “YouTube”
- Find the video that you wish to download
- Select the video by simply tapping on it
- Directly underneath the video’s screen to the right, there is a curved arrow pointing to the right. This arrow is the “Share” option
- Tap on the arrow and choose “Copy Link”
- You’ll see a small pop-up on the bottom of your screen that says “Success” once you’ve chosen to copy the link. This means that the link has been successfully copied and you’re ready to get into the app and download
Documents

Tap on the Documents App
- It will take you to the Home screen, where you’ll see all of your files/folders titled “Photo Albums,” “iTunes Files,” “iCloud,” “Downloads,” “Scans,” and “Recently Deleted”
- On the very bottom right-hand side of the screen, you’ll see a blue compass icon
- Take your finger and drag the blue compass icon from right to left
- Tap on the internet browsing bar at the top of your screen and type “www.en.savefrom.net”
- Tap the URL box that says “Enter the URL” and paste the YouTube link in the box
- This will automatically take you to the video downloader tool where you’ll scroll down slightly to where it says “Download” in green and an MP4 option directly to the right
- Tap “Download”
- Wait approximately 10 seconds or so and a new window will appear to give you the option of saving your video to the “Documents/Downloads” file
- Once you’ve titled your file, tap “Done” at the top right-hand corner of the screen
- At the bottom of your screen, you’ll see a small arrow pointing downwards
- Tap the arrow and your video will appear in your “Downloads” file
- Tap the “X” to exit out of the screen
- To go back to the home option, take your finger and drag the blue file icon located at the bottom left-hand corner of the screen from left to right
- Once you’re at the home screen, go to the “Downloads” file
- Your video will appear in this file. If you want to move this video into a different, more easily accessible file on your iPhone, tap the small “…” icon located underneath the video and select the “Move” option. Here, you can move the file to your iCloud or to your Photos where you can access it directly from your Photo Album. If you want to move it to your Photos, simply select that option and tap “Move to Photos” in the blue bar at the bottom of your screen
How to Fix Your iPhone iOS Battery Life Problems

Over time and with constant use, you may encounter some issues with low battery life on your iPhone. No matter how long you charge your iPhone, as soon as you take it off of the charger, your battery seems to drain down to 1% quicker than ever. Fear not! This does not necessarily mean that your iPhone is hopeless. There may be a solution to optimize your battery life so that you can use your iPhone without worrying about it dying on you.
First things first, you want to check your iPhone’s battery usage. Here’s where to start.
- Go to “Settings”
- Tap on “Battery” and wait for the “Battery Usage” to populate
- Tap on “Show Activity”
- Tap on “Last 10 Days”
At this point, any rogue apps that you may have open on a Google or Safari app that may be burning up your battery life must be closed. These cause for most iPhone users’ battery life consumption issues and once those windows are forced to quit, then your battery life will return to normal.
To perform the task of force-quitting unused app windows, simply follow these easy steps.
- Double click your home button
- Swipe up for each app that you want to close, flicking it in an upward direction
- This will close the app and clean up the back end of your iPhone
Next, you should check the Battery Health on your phone.
- Go to “Settings”
- Tap on “Battery” > Battery Health
- Anywhere from 95% – 100% is where you want to be. If your phone is at 79% or less, then it has been significantly downgraded and you may need to replace your iPhone
You can also fix this problem by restoring your iPhone as a brand new phone.
- Go to “Settings” > General
- Tap on “Reset”
- Tap on “Erase All Content and Settings”
- Tap on “Erase Now”
You may also place your phone on “Low Power Mode” whenever your phone’s battery life is down to 20% or lower.
- Go to “Settings”
- Tap on “Battery”
- Swipe the bar next to “Low Power Mode” to activate it (green)
- rony
- : May 16, 2019